Home » Integration Support » SILQ
SILQ

InfoTrack provides a free plugin which allows you to perform property, company, personal and other searches from within your matters in SILQ.
You will need to have or to setup an account with InfoTrack and know your InfoTrack username and password to setup the plugin.
You will need to have or to setup an account with InfoTrack and know your InfoTrack username and password to setup the plugin.
Most Law Firms use InfoTrack in one of two ways – with either a company wide account (i.e. everyone in the firm uses the same login details) or with dedicated user accounts (i.e. each fee earner has their own username and password for InfoTrack).
Step 1: Log in to SILQ and click on your name in the top right corner to view the drop down menu, then click System Settings.
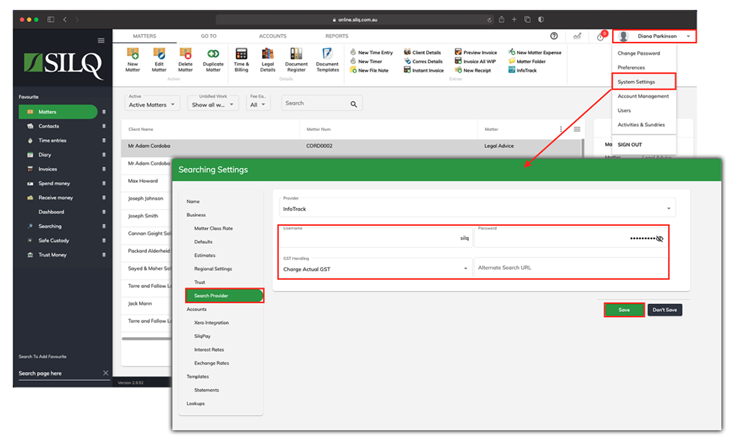
Step 2. Click Search Provider in the side bar. You will see two fields where you can enter your InfoTrack Username and Password.

Note: If your firm has a separate InfoTrack account for each Fee Earner, then rather than putting the login in System Settings, you would add it to each users account settings by following the below steps:
1. In the top right hand corner, in the dropdown under your name click on Users.
2. Edit the specific user.
3. You will see a tab for InfoTrack. Add that specific user’s login details.
Step 3. Specify GST handling.
The two options are Charge Full GST and Charge Actual GST.
Charging Full GST will include the statutory cost of the search as well as the cost and the GST that was charged to you by InfoTrack. For example the statutory cost is $7.50, which is GST free and InfoTrack charges $5.00 per search plus 10% GST which equals $5.50. So the Charging full GST option will mean you will charge 10% on the total of $13.00, which will equal, $1.30 GST.
While selecting Charge Actual GST will include the statutory cost of the search as well as just the cost that was charged to you by InfoTrack for doing the search excluding GST. For example the statutory cost is $7.50, which is GST free and InfoTrack charges $5.00 per search plus 10% GST which equals $5.50. So the Charging Actual GST option will mean you will only charge GST on $12.50, which doesn’t include the 10% GST InfoTrack charged you for doing the search. So the GST on the total of $12.50, will equal, $1.25 GST.
Now you are ready to begin using InfoTrack integrated with SILQ.
Step 1: Log in to SILQ and click on your name in the top right corner to view the drop down menu, then click System Settings.

Step 2. Click Search Provider in the side bar. You will see two fields where you can enter your InfoTrack Username and Password.

Note: If your firm has a separate InfoTrack account for each Fee Earner, then rather than putting the login in System Settings, you would add it to each users account settings by following the below steps:
1. In the top right hand corner, in the dropdown under your name click on Users.
2. Edit the specific user.
3. You will see a tab for InfoTrack. Add that specific user’s login details.
Step 3. Specify GST handling.
The two options are Charge Full GST and Charge Actual GST.
Charging Full GST will include the statutory cost of the search as well as the cost and the GST that was charged to you by InfoTrack. For example the statutory cost is $7.50, which is GST free and InfoTrack charges $5.00 per search plus 10% GST which equals $5.50. So the Charging full GST option will mean you will charge 10% on the total of $13.00, which will equal, $1.30 GST.
While selecting Charge Actual GST will include the statutory cost of the search as well as just the cost that was charged to you by InfoTrack for doing the search excluding GST. For example the statutory cost is $7.50, which is GST free and InfoTrack charges $5.00 per search plus 10% GST which equals $5.50. So the Charging Actual GST option will mean you will only charge GST on $12.50, which doesn’t include the 10% GST InfoTrack charged you for doing the search. So the GST on the total of $12.50, will equal, $1.25 GST.
Now you are ready to begin using InfoTrack integrated with SILQ.
To perform a search from the Matters screen, navigate to the matters screen by clicking on the Matters button on the left Favourites Bar.
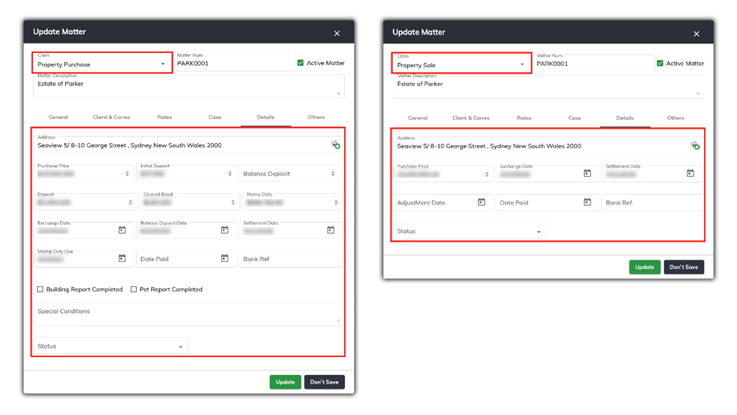
It is important to fill in all the fields in the Details tab as well as the main Correspondent in the Client & Correspondent tab as all this information will automatically be pulled out from the matter and transferred to the InfoTrack website, so you won’t need to retype this information when doing a search. This will save you a lot of time.
The screen shots below illustrate both a Property Sale and Property Purchase selected from the Class dropdown menu and the Details tab for these Classes. You will notice how the fields in the Details Tab have changed depending on which Class of law has been chosen.
Once the applicable data fields are completed in SILQ, click on the InfoTrack button in the Extras section of the top toolbar, then click on InfoTrack Search. Your web browser will open a new tab and you will be automatically logged into the InfoTrack website where you can perform your search.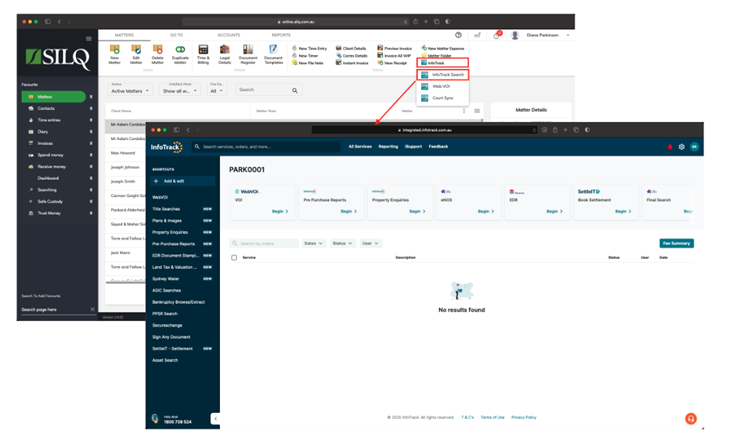
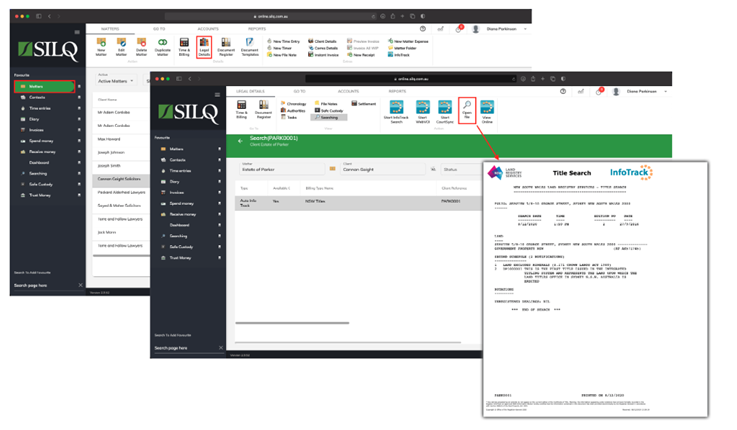
Once you have completed the search request in InfoTrack, return back to SILQ and click on the Legal Details button in the top toolbar, which will take you to the Legal Details window for the matter, then click on the Searching tab which will contain the completed InfoTrack searches.
If there is a PDF document available, the Open File button will be enabled on the Top Toolbar. If the Open File button is enabled, to view the document, click on a document to highlight it, and then in the Top Toolbar, click on the Open File button, and your document will open to be viewed or printed.
In the Top Toolbar, you will also see a View Online button. Some documents have the ability to be viewed online on the InfoTrack website. Clicking on that button, will launch the InfoTrack website and it will reopen the document in your web browser on the InfoTrack site and you will be able to continue to make further searches in relation to that matter.
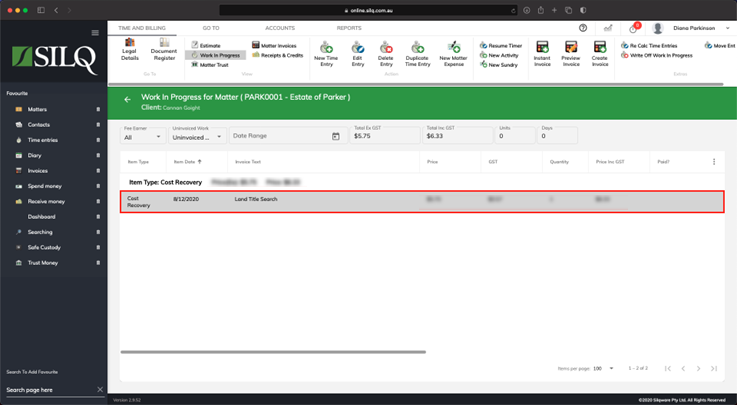
The costs searches performed are automatically placed against matter. To view, open the Time and Billing Window in the Work in Progress tab where the search entries are ready for invoicing.
It is important to fill in all the fields in the Details tab as well as the main Correspondent in the Client & Correspondent tab as all this information will automatically be pulled out from the matter and transferred to the InfoTrack website, so you won’t need to retype this information when doing a search. This will save you a lot of time.
The screen shots below illustrate both a Property Sale and Property Purchase selected from the Class dropdown menu and the Details tab for these Classes. You will notice how the fields in the Details Tab have changed depending on which Class of law has been chosen.

Once the applicable data fields are completed in SILQ, click on the InfoTrack button in the Extras section of the top toolbar, then click on InfoTrack Search. Your web browser will open a new tab and you will be automatically logged into the InfoTrack website where you can perform your search.

Once you have completed the search request in InfoTrack, return back to SILQ and click on the Legal Details button in the top toolbar, which will take you to the Legal Details window for the matter, then click on the Searching tab which will contain the completed InfoTrack searches.
If there is a PDF document available, the Open File button will be enabled on the Top Toolbar. If the Open File button is enabled, to view the document, click on a document to highlight it, and then in the Top Toolbar, click on the Open File button, and your document will open to be viewed or printed.
In the Top Toolbar, you will also see a View Online button. Some documents have the ability to be viewed online on the InfoTrack website. Clicking on that button, will launch the InfoTrack website and it will reopen the document in your web browser on the InfoTrack site and you will be able to continue to make further searches in relation to that matter.

The costs searches performed are automatically placed against matter. To view, open the Time and Billing Window in the Work in Progress tab where the search entries are ready for invoicing.

1. Login to Smokeball
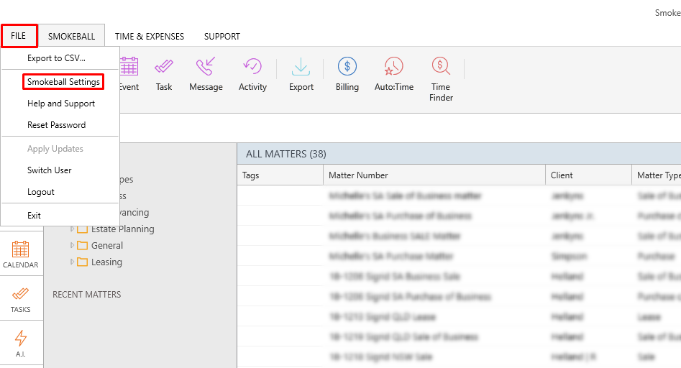
 2. Go to the Smokeball Settings
File → Smokeball Settings
 3. Select InfoTrack as your search Provider
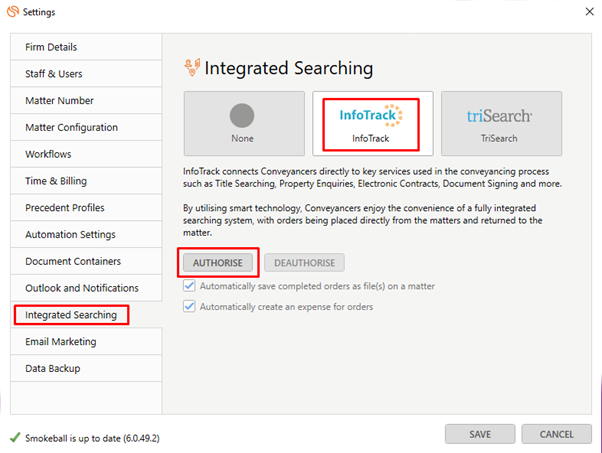
Integrated Searching → Select InfoTrack → Click Authorise
 2. Go to the Smokeball Settings
File → Smokeball Settings
 3. Select InfoTrack as your search Provider
Integrated Searching → Select InfoTrack → Click Authorise

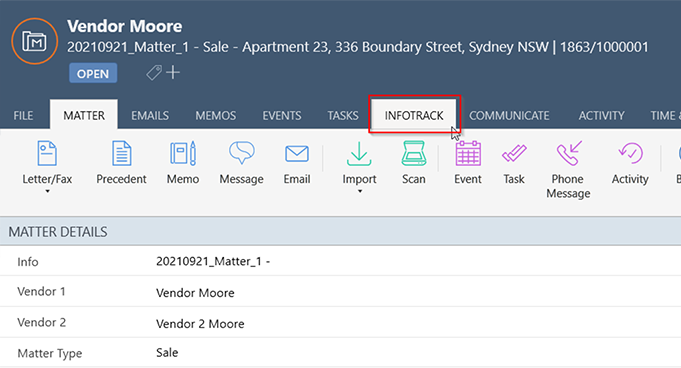
Open a matter and click on the InfoTrack Tab
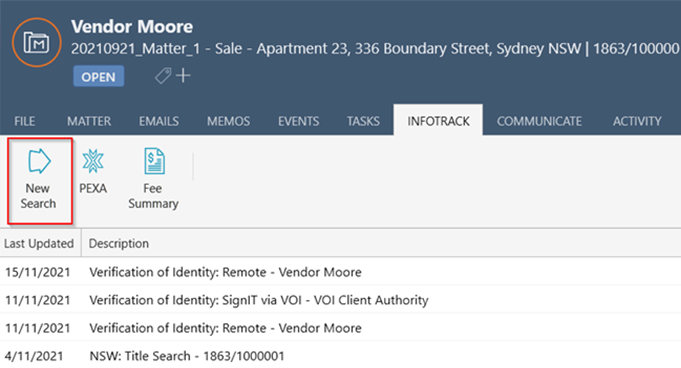 In the tab, it will show the history of orders for that matter, to start searching with InfoTrack just click on the ‘New Searches’ Button which will direct you to the InfoTrack website.
 In the tab, it will show the history of orders for that matter, to start searching with InfoTrack just click on the ‘New Searches’ Button which will direct you to the InfoTrack website.


